

Ever watched a staff member fumble with a dead iPad while a line of customers grows behind them? Or worse, opened a drawer to grab a checkout tablet and found it missing entirely? If you manage tablets for checkout at a store, hospital, campus, or event venue, you already know the pain. Here’s the thing: a great tablet checkout setup isn’t just about the software on the screen. It’s about the whole ecosystem – the flow, the hardware, the routines, and yes, the tablet checkout locker where those devices live between shifts.
What “Good” Tablet Checkout Looks Like?
So what does a smooth tablet and iPad checkout setup actually look like in 2026? Picture this: a staff member walks up to a smart charging locker, taps their PIN or badge, grabs a fully charged iPad from their assigned bay, and heads to the floor. They serve customers – fast checkout, digital wallets, done. At shift end, the tablet goes back in the locker. The system logs who used what and when.
That’s the whole process in a nutshell. But getting there means nailing three layers:
- UX – the checkout flow on-screen (simple, fast, finger-friendly)
- Hardware – tablet stands, charging stations, tablet checkout lockers
- Operations – who’s responsible for devices, how they’re stored, tracked, and charged
Think of products like honestwaves secure phone charging stations, smart lockers, and portable charging kiosks as the infrastructure behind the scenes. They’re the reason the iPad is charged and ready when someone needs it – not sitting dead in a desk drawer.
This guide is for businesses using tablets for checkout in retail, hospitality, healthcare, schools, and events. Not casual home use. Real operational environments where a dead device or a clunky checkout experience means lost revenue and frustrated people.
Why Tablets and iPads at Checkout Are Worth the Effort?
Imagine a busy campus bookstore during fall rush week. Lines snake out the door. Then someone hands three staff members iPads, and they start walking the line – scanning items, processing payments, handing out receipts by email. The line melts.
That’s what mobile checkout does. And it’s not hypothetical. Haynes Furniture deployed 500 mobile POS tablets across its outlets and cut in-store checkout time from 11 minutes to about 2 minutes. That’s a massive difference.
Here’s why it makes sense for most environments:
- Faster lines – fewer registers needed, more mobile checkout points
- Flexible checkout options – in-aisle, curbside, lobby, even bedside in hospitals
- Better data capture – digital receipts, loyalty signups, usage analytics
- Modern perception – customers and visitors expect it
A strong tablet checkout flow can turn dead corners – lobbies, waiting rooms, concourse areas – into real service or revenue touchpoints.
But here’s the sad truth: without a plan for charging, security, and UX, those same tablets create chaos. Dead batteries, missing devices, confused staff, long lines. That’s the “before” picture we’re going to fix.
Designing a Clean Tablet Checkout Flow (Without Overwhelming the Screen)
The mobile checkout flow on a 10–13″ iPad screen needs to be even more focused than desktop. Mobile devices have bigger touch targets to worry about, and there’s no mouse precision here – just fingers. Design mobile-friendly checkouts with minimal clutter and no extra steps.
The standard flow looks like this:
- Cart → 2. Shipping/pickup info → 3. Payment → 4. Review → 5. Confirmation
For in-person tablet sales, you can often compress this down to Cart → Payment → Confirmation. Shipping information is only needed when the order involves physical delivery. No shipping costs to calculate. Just ring it up and go.
Best practices to eliminate distractions:
- No random links leading away from checkout
- Keep marketing banners out of the payment screen
- Avoid full-page popups mid-purchase
- Use a single column layout with big, finger-friendly buttons and enough whitespace to avoid mis-taps
Displaying total costs upfront can reduce cart abandonment by 39%. Users prefer seeing total costs upfront to avoid surprises, so make sure your order summary is crystal clear – no hidden fees sneaking in at the last step. Clear order summaries prevent user frustration during checkout.
Streamline order review processes to facilitate user decision-making. Provide post-checkout clarity by detailing next steps after purchase – whether that’s “your order’s being prepared” or “check your email for the receipt.” Ensure accessibility features for a smoother checkout experience for all users, including larger fonts and high-contrast buttons.
Streamlining Checkout Forms and Form Fields on Tablets
Tablets invite more typing than phones – that bigger on-screen keyboard feels more comfortable. But you still shouldn’t treat a tablet checkout form like a desktop experience with twenty fields.
Here’s what matters: 18% of users abandon carts due to checkout complexity. And reducing form fields can decrease cart abandonment by another 18%. As part of a streamlined mobile checkout process, optimal mobile checkout forms should have 6-8 fields. That’s it.
Stick to the essentials:
- Name
- Shipping address (only if relevant)
- Payment details
- Minimal opt-ins
About 50% of websites ask for repeat information during checkout – don’t be one of them. Use auto-fill features to speed things up significantly. Mobile shoppers especially appreciate it when their card details and shipping info auto-populate.
A few technical tricks that make a big difference:
- Use the right input types: pull up a numeric pad for ZIP codes and credit card numbers, an email keyboard for email fields
- Use floating labels instead of placeholder text that disappears when typing – clear, visible field labels should stay in view throughout longer forms rather than relying on placeholders alone
- Implement inline validation so errors get caught immediately, not after hitting “submit”
Fewer fields plus smarter defaults equals fewer errors and a faster checkout experience. That’s especially true in busy environments like clinics, stadiums, or campus stores where nobody has patience for “please re-enter your credit card type.”
Guest Checkout vs. Accounts: What Works Best on Shared Tablets
Here’s a tension you’ve probably noticed: marketing teams love accounts. They want emails, profiles, purchase history. But front-line staff? They hate explaining registration to someone who just wants to buy a hoodie and leave.
On shared tablets – lobby kiosks, portable event iPads, hospital check-in stations – guest checkout should almost always be the default. Use guest checkout options to speed up the purchasing process. This isn’t debatable when 25% of abandoned carts result from forced registration.
Forcing logins on a public device feels unsafe and slow. Think about it from the customer’s perspective: you’re handing your email and password to a tablet that a stranger just used. That’s weird.
The smarter approach:
- Default to guest checkout for quick, low-commitment purchases
- Offer account creation as a gentle option after the purchase is complete
- Let users optionally add an email or phone number for receipts and loyalty at the end
And here’s the part that doesn’t always get mentioned: on shared mobile devices, you must ensure the app clears personal data, customer information, and browser sessions between customers. The next user should always see a fresh start screen. No leftover shipping info, no saved card details, nothing.
Using Digital Wallets and Modern Payment Options on iPads
Digital wallets reduce checkout time by eliminating manual data entry. That’s the headline. But the real story goes deeper.
Stripe’s data shows that using a digital wallet cuts average mobile checkout time roughly in half. Apple Pay can boost conversion rates by 22.3% for businesses. Using digital wallets can boost conversion rates by 22.3% – and integrating them can significantly reduce cart abandonment rates.
Here’s what you should support:
- Apple Pay and Google Pay (the big two)
- PayPal and relevant local wallets
- Card-on-file for returning customers in your own app
- Credit card as a fallback (always)
Where should wallet buttons appear on the checkout screen? Near the top of payment methods. Full-width buttons. Clear logos for instant recognition. Displaying payment options boosts brand credibility and trust. Optimize payment options to support faster checkout experiences.
Digital wallets enhance security through tokenization of payment information – the actual card number never touches the device. Using digital wallets increases customer trust during mobile transactions, which matters a lot on shared tablets where desktop shoppers’ expectations don’t apply.
For B2B or institutional setups – hospitals processing co-pays, universities handling bookstore purchases – you’ll need a clear set of checkout options that mix corporate cards, purchase orders, and digital wallets. The payment processor should handle all of these cleanly without complex checkout flows that confuse staff or customers.
Optimizing the Tablet Checkout Experience for Speed
Quick reality check: if a kiosk or tablet has to “think” for more than a second or two between steps, people start looking for a staff member or just walk away. And 85% of mobile users expect sites to load faster than desktop.
Here’s what keeps things snappy:
- Compress images – product thumbnails don’t need to be 4K
- Cache assets on the device when possible – especially for apps running on the same iPad all day
- Keep checkout scripts lean – strip out anything that doesn’t directly serve the purchase
For reference, one smart kiosk deployment (FeelEat) achieved a median order completion time of 42 seconds, with 99.7% kiosk uptime and a 99.4% payment success rate. Those are the benchmarks to aim for.
Every extra second on a checkout page adds up – especially when tablets are shared among mobile users in a line. Load times matter more than most people think.
Test on real hardware. Not a desktop simulator. The same iPads and Android tablets your staff actually use. And build in ongoing performance monitoring: occasional speed audits, feedback loops from staff who notice lag during rush hours, and simple error message tracking when payments fail.
Physical Setup: Tablet Stands, Mounts, and Checkout Stations That Don’t Wobble
Now let’s talk about the physical side – how the checkout iPad actually sits in front of a customer or staff member.
Your options:
| Setup Type | Best For | Notes |
|---|---|---|
| Low-profile countertop stands | Retail lanes, reception desks | Stable, clean look, easy cable routing |
| Taller floor stands | Lobbies, check-in areas | Height-adjustable, ADA-friendly |
| Wall mounts | Small check-in spaces, corridors | Saves counter space, permanent install |
| Portable kiosk stands | Events, pop-ups, outdoor lines | Lightweight, quick to set up and break down |
Think about a BOSSTAB-style universal tablet stand or a ShopKeep-style iPad stand for that stable, professional look. Angle and height matter – you want to avoid glare, make signatures and PIN entry comfortable on the small screen, and ensure ADA-friendly positions.
Cable management is the thing nobody talks about until someone trips over a charging cable mid-checkout. Hide or route cables cleanly so they don’t get yanked, tripped over, or unplugged. Stick to authorized resellers to avoid counterfeit accessories – cheap cables cause more problems than they solve.
Securing Tablets with a Tablet Checkout Locker or Smart Charging Locker
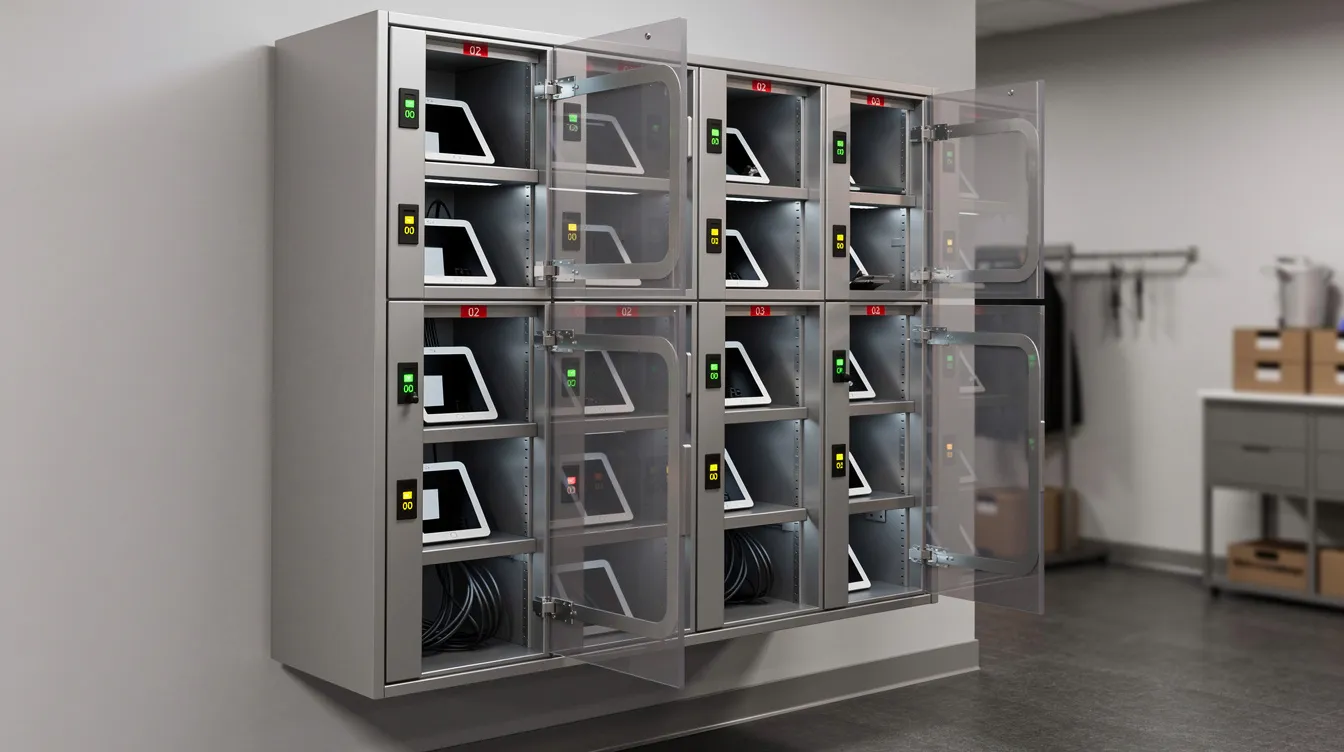
You come in for a morning shift and three checkout iPads are dead, one is missing, and another is locked in someone’s desk drawer. Sound familiar? This is exactly what a tablet checkout locker is meant to prevent.
In plain language: it’s a secure cabinet with individual bays where tablets live, charge, and get checked in or out with PINs, RFID badges, or access codes. Use barcode or QR code scanning for efficient device check-in and check-out. Use dedicated circulation software with barcode scanners for efficient checkouts.
If you’re familiar with how a Chromebook charging locker works in schools, the concept translates directly to retail, healthcare, and venues for tablets and iPads.
Best practices for tablet checkout lockers:
- Assign each bay to a specific device ID
- Log checkouts by staff member name and time
- Require tablets to be returned at shift end
- Keep charge status visible on the locker display or a cloud dashboard
- Maintain buffer stock of devices to ensure instant replacements if one breaks
The honestwaves 30 Bay Smart Locker for iPads & Tablets gives admins cloud dashboards, usage analytics, and access control for entire fleets of checkout tablets. You can see which bays are used most, which devices are constantly running low, and who forgot to return their iPad – again.
Battery, Charging, and End-of-Day Device Routines
Nothing kills a line faster than “Sorry, this iPad is about to die, can you move to that register?
According to Open Repair Alliance data, about 16.7% of tablet repairs are battery-related and roughly 17% involve screen damage. Most of these issues are preventable with decent routines.
Here’s a simple, repeatable process:
- At shift change, staff dock tablets in their assigned locker bay
- Verify charging lights are on
- Hand off ready devices to the next team
- At day’s end, count devices, confirm they’re locked and charging, report any missing or damaged unit
Environmental best practices that actually matter:
- Keep tablets between roughly 32°–95°F
- Don’t leave them in hot cars or by sunny windows
- Don’t run them to 0% constantly – it degrades battery life fast
Design a dedicated charging station layout to enhance device organization. For front-of-house devices, use tablet checkout lockers. For back-of-house, consider charging tables. For events, portable charging kiosks keep things mobile.
Keep spare accessories pre-kitted for instant replacement. Bundle accessories in dedicated cases to prevent missing components – chargers, cables, and cases should always travel together.
Protecting Data and Devices: Security, Privacy, and Compliance
Let’s separate two types of risk: physical loss (the tablet walks away) and data risk (customer or patient payment information left on the device).
Physical security basics:
- Screen locks with short auto-lock timers for unattended kiosks
- Implement a Mobile Device Management (MDM) solution to manage devices efficiently
- Standardize device images using mobile device management software upon return – so every device starts fresh
Why kiosk mode is non-negotiable for customer-facing tablets: It locks the device to a single app – checkout, registration, ticketing – and prevents web browsing, app installs, or wandering into Settings. Apple iPads support Single App Mode via supervised devices through Apple Business Manager and MDM. Android tablets have equivalent dedicated device modes.
Ensure the use of secure payment methods in checkout processes. Build trust by displaying security indicators at checkout – things like lock icons near payment buttons and an SSL certificate badge. Extended Validation SSL Certificates increase customer trust during checkout. Visible security signals near payment buttons reduce cart abandonment. The numbers back this up: 19% of shoppers abandon carts due to trust issues, and 39% of cart abandonments are due to high extra costs or surprise fees. Displaying shipping costs early reduces cart abandonment.
For shared device setups, data blocking technology in charging lockers ensures staff can charge tablets without exposing data to unknown hardware through secure USB ports.
For healthcare, think HIPAA. For schools, FERPA. For any site processing payments, PCI compliance matters. A credit card required field should never store raw numbers on the device itself.
Designing Tablet Checkout for Different Environments
The same best practices look different depending on where you are. Here’s how they play out:
Retail: Fast guest checkout, clear order summary with no hidden fees, digital wallets front and center, simple receipt options (email or SMS). The checkout optimization focus here is speed – every second counts when there’s a line. E commerce sites selling in-store should mirror the mobile web experience on their tablets.
Events and venues: Portable tablet checkout with mobile hotspots. Portable charging kiosks in back-of-house areas keep spare devices ready. Quick guest checkout for merch and concessions – nobody’s creating an account to buy a $12 beer. You might be on a different device every hour, so the whole process needs to work without history or saved state.
Schools and universities: A Chromebook charging locker mindset applies perfectly to iPads used at check-in windows or campus events. Smart charging lockers for enterprise and education let student workers check devices in and out with accountability. Users tend to be less careful with shared devices, so rugged cases and clear checkout logs matter.
Healthcare: Privacy screens on tablets used for patient checkout. Minimal on-screen personal data. Secure lockers for tablets between patients. And disinfection routines – which brings us to the next section.
Hygiene and Durability: Keeping Tablets Checkout-Ready in High-Traffic Spaces
Everyone touches these tablets. Staff, guests, patients, students. Cleaning isn’t optional – it’s part of the checkout process.
Safe cleaning practices:
- Soft lint-free cloths and manufacturer-approved wipes
- Never spray liquid directly on the screen
- Follow Apple or Android device-specific guidance
Here’s where it gets interesting: UV-C disinfection options built into some smart lockers can handle this automatically. In one hospital study, a UV-Smart D25 device reduced bacterial contamination so effectively that 87% of tested shared devices had zero colony forming units after disinfection. The baseline? Many had moderate to high contamination.
For tablets that live near food service areas, outdoor lines, or student-heavy environments, invest in rugged cases and tempered glass screen protectors. They’re cheap insurance.
A cracked or sticky screen instantly cheapens the checkout experience, even if the software is perfect. Brands continue to underestimate how much the physical condition of a tablet shapes customer perception.
Training Staff and Building Accountability into the Checkout Process
Even the best hardware and software fail without simple, human-friendly training. You can have the sleekest mobile checkout experience in the world, but if nobody knows how to restart a frozen app, it’s useless.
Training essentials:
- How to launch and navigate the checkout app
- Basic troubleshooting (screen freeze, payment error, connectivity drop)
- What to do if an error message appears mid-transaction
- How to sanitize the device between users
- How to use social login or company name fields when processing B2B orders
Assign device IDs per station or shift – “Front Counter iPad 2” – and log who checked it out from the tablet checkout locker. Require digital agreements from borrowers to facilitate accountability.
Build these into closing checklists alongside counting drawers:
- ✅ Return tablet to locker
- ✅ Confirm charging indicator is on
- ✅ Log any issues (cracked screen, slow performance, missing stylus)
Automate overdue notifications to reduce late returns. Establish an express return station for quicker device returns during shift changes. Standardize a rapid inspection routine for returned devices – check screen, battery level, case condition.
Managers should review locker usage analytics to spot patterns: missing devices, constant low battery, or heavy use at certain times of day. Coupon fields or form configurations that cause repeated errors should get flagged in weekly debriefs.
Measuring and Improving Your Tablet Checkout Experience Over Time
The first rollout is never perfect. That’s okay. What matters is how quickly you learn and tune.
Track these metrics:
| Metric | Why It Matters |
|---|---|
| Checkout time per customer | Measures your flow efficiency |
| Cart or form abandonment on tablets | Identifies friction in your checkout form |
| Devices unavailable (dead battery, missing) | Shows operational gaps |
| Payment failure rate | Highlights payment processor or connectivity issues |
| Staff support tickets | Reveals training gaps |
Gather front line feedback: short debriefs after big events, quick surveys from staff who use the tablets daily, and observation during peak times. Remove friction wherever you find it.
Our Smart lockers provide device usage analytics that help teams spot underused hardware or overworked bays – data that’s hard to get any other way.
Tie everything back to business outcomes: shorter lines, higher throughput, better reviews, and fewer “the tablet’s dead again” moments. Improve checkout continuously, not just at launch.
FAQs
What exactly is a tablet checkout locker, and when do I need one?
It’s a secure, powered cabinet with individual bays sized for tablets or iPads. Each bay charges the device and controls access via PIN, RFID, or code. You need one whenever you have more than a handful of shared tablets – basically any time you can’t just leave devices on a counter and hope for the best. They handle security, charging, and accountability in one piece of hardware.
How many tablets do I need for checkout at a mid-size store?
A rough rule: one tablet per checkout point you want to run simultaneously, plus 10–20% spares. So if you typically need four active checkout stations during peak hours, budget for five or six devices total. Maintain buffer stock of devices to ensure instant replacements.
What’s the safest way to clean a checkout iPad?
Use a soft, lint-free cloth slightly dampened with 70% isopropyl alcohol or a manufacturer-approved disinfecting wipe. Don’t spray anything directly on the screen. For higher-volume environments like hospitals or schools, UV-C disinfection built into smart lockers is worth considering – it handles the job automatically between uses.
Can I use the same locker system for tablets and phones?
Yes. Many smart locker solutions have adjustable bays that fit both tablets and phones. It depends on the bay dimensions and charging connector setup, but honestwaves lockers, for example, are designed for mixed device fleets.
How do Chromebook charging locker practices translate to tablets in schools?
Almost one-to-one. The same principles – assigned bays, logged checkouts, centralized charging, MDM management – apply whether you’re storing Chromebooks or iPads. The main difference is bay size and connector type. The operational routines (check out at start of day, return and charge at end) are identical.
Does supporting digital wallets really make a difference on tablets?
Absolutely. Digital wallets cut average checkout time roughly in half according to Stripe’s data, and they remove the need for manual card details entry on a shared device, which also helps with security and customer trust on the mobile web.
If you’ve got a specific setup question, you’re planning checkout tablets for a hospital lobby or a stadium concourse – reach out to our charging stations. They’re genuinely helpful with mapping environments to the right hardware mix.